Introduction
Ever wanted to remotely watch something together with your friends, family, or small community?
This is a way to do it.
The goal of this project is to allow people in multiple locations to watch any media file together in sync.
Currently only on desktops. (Windows, Linux, Mac)
Mobile and TV apps are possible, at least for Android.
(A proof of concept was working on both my Android phone and TV)
An iOS version may exist one day as it should build.
(It is not possible to build without having an Apple device which I don't have)
Read more about the reasoning.
Have a look at how it looks like in the gallery.
Basics
- Everyone that wants to watch together needs a client.
- One person has to host a server.
- Everyone is added in the admin panel
- Everyone connects to the server and joins the same watch group.
- Watching together begins.
Current Features
- Invite system - Create invitations for users to join your server.
- Watch groups - Creation and joining of a synchronized group of users, watching the same media.
- Local media - Possible to watch local media files without a server.
- Custom subtitles - Option to add a custom subtitle file to currently playing media.
- Server-side additional subtitles - Possibility to upload subtitle files.
- Subtitle and audio track choice - Possible to choose for the entire group on play.
- Server media - The server holds your media files.
- Server media library - Movies and Series with seasons, collections of media files with a poster image and title.
- Client playlist - local play list, you can queue available media from the server to play. (You can queue an entire series season)
- Local media sharing - It is possible to share a local file with the server. (Currently no access control)
- Remote media sharing - Downloading media from external websites.
- Admin panel - The place where server owners and administrators decide who has access and what they can watch.
- Play time tracking - When you stop watching and return later, you get the option to continue where you left off. (Server media only)
Everything is under development, including this documentation
The project has not yet seen any big stress tests with tens or hundreds of users connecting over the internet to see how it performs.
Things will break, bugs will be found (and probably created).
Many things will be added or changed.
Keep in mind that this is a one-man part-time project, so the speed of change won't be very fast, there are sometimes longer times with no updates.
Some features, improvements, or fixes might get prioritized over others depending on popularity or personal preference.
Why?
Why create this when things like Plex or Jellyfin exist?
Plex, Jellyfin and other similar projects have allowed users to keep their media in one place but they haven't made it very easy to watch it together.
Sometimes there are random issues that make the watching experience very annoying.
Things like random buffering, stuttering, or synchronization issues even while having plenty of bandwidth and hardware to handle playback.
Other media
What if you wanted to watch a YouTube video, a short, or a Twitch clip?
What if you wanted to show your friends a replay you got on your hard drive?
You don't keep these on your media server.
You have a few options:
-
Send it over chat
- Size limitations
- Back to the countdown method
-
Upload to YouTube
- Time consuming
- Copyright issues = video gets blocked
- Still needs a countdown unless you use the next point
-
Find a website that allows for watching YouTube or uploaded files together
- Uploaded file size limitations
- Possible time or quality limitations
- Advertisements in every possible place
- Synchronization issues
- Registration/Login - personal information extraction, possible password leak
- Who knows what else they put on it
The solution
Having suffered through all existing solutions and always bumping into some sort of issue...
Enough is enough.
I had to solve this.
Being a programmer has the upside of being able to write your own software.
Using .NET / C# with a burning hatred for web development, I didn't think it was possible to make standalone graphical applications very easily. Especially one that has a video player.
However, I eventually found - Avalonia UI.
A nice cross-platform UI framework.
But that unfortunately doesn't solve the video player issue as there is no video player yet.
Then came the second crucial discovery - LibVLCSharp with support for Avalonia.
Thanks to the team over at VLC there was a way for me to stay in C# and still make what I needed.
If you didn't know - VLC is a free and open-source media player that can probably handle anything you can throw at it.
I would highly recommend using it as your main media player.
So I started and didn't stop until I could watch all the movies and series with my friend without any issues.
It took days, weeks, and months to get things working properly and looking acceptable.
Making user interfaces isn't my strong side so it still has a lot of space for improvements.
(have a look at the gallery)
In the end I can now finally watch whatever I want together with my friend.
There are no longer any random issues with stuttering, buffering, or synchronization.
Once media loads, the playback starts, and there are no issues with the internet connection - it will just work.
(Unless I screw something up in an update or there are issues on other platforms I am not aware of yet)
Native application performance and VLC codec support, meaning you can play pretty much anything you throw at it.
No transcoding or remuxing needed.
Now, I am not breaking the laws of physics here.
If your internet connection or hardware simply can not handle streaming a given media file, it won't magically solve this issue.
(Although, if internet speed is a common issue, we could talk about pre-downloading and watching from a local file in the future)
For an example go to bandwidth
The community
Since I had this problem, there is a good chance that others are also having it.
I have seen posts asking for help with playback issues, and looking for solutions to watching together.
The plan is to let everyone test/use it for free but ask for a purchase/payment to support the project.
There won't be any limitations in the free version.
Currently, no code is even written to ask for or take payments.
Core features and stability come first.
More reasoning and thoughts on open-source.
Client and Server
This project is divided into 2 parts.
The client and the server.

The Server
This is the place clients connect to and watch media from.
The server does many things:
- Scans available media files
- Stores media metadata in the database.
- Manages users
- Manages the media library
- Manages permissions and controls access
Everything outside of actually playing media is done through a server.
Administrators can control the server configuration and set who has access to what.
The server runs on the .NET runtime, and it runs on most platforms.
But currently it is recommended to run it using docker compose.
If you need to run it on a Windows machine to host a server for your friend group, that is also possible but will require some manual setup.
Since the application requires a PostgreSQL database.
Hop on the Discord to talk things through.
(If it becomes a common use case, there will probably be dedicated instructions for it)
The Client
This is the player, the application you download on your desktop.
The client on its own can play back any media that VLC can play (Thanks once again to the team over at VLC).
You can use the "Open with" option on a media file or drag it over the player executable if you for some reason don't have VLC installed, and it will open it as well.
VLC has many more features and options focused on regular media playback, this project focuses on the synchronization part and watching media together.
The main use is when connected to a server and inside a watch group.
Then the client together with the server ensures that everyone in the group is playing the same media, at the same time.
(At least that is what I'm trying to achieve here)
If you try to break things, you probably will this early on.
The goal is to have a client application available for as many platforms as possible.
Going with Avalonia UI has greatly helped with the desktop side of things.
Windows and Linux are supported and working.
MacOS should also work as it did once before, but I don't have any machine to test newer version.
I automated release builds to always build for all desktop platforms.
For mobile, there will most likely be a MAUI application in the future.
(Currently not quite production ready but slowly getting there)
I managed to make a proof of concept on my Android phone a long time ago and it did manage to play some media from the server, although not without a fight.
My Android TV, after an even bigger fight with the UI, also managed to finally play media from the server.
Mainly focusing on the Desktop version for some time now. The "proof of concept" builds for Mobile/TV are probably no longer compiling due to the amount of changes that happened over time.
If there is an increased demand for those platforms, I will revisit these versions sooner rather than later.
Networking and Security
A regular connection works on a very simple custom protocol built on top of TCP.
On top of it goes an encryption layer.
Connections are encrypted by default using RSA (4096-bit), ephemeral ECDH, and AES (256-bit).
Encrypting a connection goes as follows:
From the connection receiving/listening side:
- Check incoming remote RSA public key.
- Send local RSA public key.
- Receive, decrypt, and derive AES key from received "Accept" message with remote ECDH public key, save received random nonce.
- Send local ephemeral ECDH public key and random nonce - encrypted with remote RSA public key.
- Receive back nonce using the derived AES key and check if its the same as previously sent.
- Send back remote nonce using the derived AES key.
- Encryption completed.
From connecting side:
- Send public RSA key.
- Check incoming RSA public key.
- Send "Accept" message with a new ephemeral ECDH public key and random nonce - encrypted using server public RSA key.
- Receive, decrypt, and derive AES key from received ECDH public key, save received nonce.
- Send back received nonce encrypted using derived AES key.
- Receive back our nonce using the derived AES key and check if it's the same as previously sent.
- Encryption completed.
From that point onwards, all messages are encrypted using the derived AES key.
This approach ensures secure and trusted connections.
- Someone without a trusted RSA key will not go past the first 2 steps.
- It is not possible to impersonate someone without their private RSA key that is never sent over the network.
- Man-in-the-middle and replay attacks are prevented by using cryptographically strong random nonces on both sides.
- Forward secrecy is achieved through the use of ephemeral ECDH keys / a "ECDH Key Exchange".
Inspired by the way SSH handles connections, without a way to use passwords (the least secure option).
User identities are RSA key pairs.
Ephemeral ECDH ensures that even in the case of someone's private RSA key being compromised, past communication can not be decrypted since the EC keys are forgotten.
Keep in mind that since someone with your private RSA key can impersonate you, they can just as easily get access to what you have access to.
This only protects against decrypting past communication.
An additional benefit is that no bots currently exist that use this protocol, there is no scanning the entire internet and attempting to use some sort of vulnerability or to scrape content like it is the norm with websites.
Since there is no way of accessing a server without a valid key pair, it is pretty much pointless to try outside of DDoS attacks to exhaust system resources by attempting to connect over and over and making each step take as long as it can.
Encrypted connections have a set timeout that simply closes the connection if it doesn't manage to open in time.
I am no security expert, this is just the best solution that I understand after many iterations and a lot of research.
If you know of a way to break this process and gain unauthorized access, please let me know.
Contact
Permissions
Once the connection is established, we reach the application-level permissions.
The server will not simply allow any command to be executed by anyone.
There are user management and access management sections in the admin panel to allow for precise access control.
Updates
Updates are distributed through dedicated "Package Distribution Servers".
They take built packages/releases and allow users to check which versions are available and download them.
When a new release is built, a manifest is created that contains all information about it.
The manifest contains a list of all files, their paths, hashes, and sizes.
Once the manifest is written, it is signed using the private part or an RSA key pair (the release key).
All builds of the installer, updater, and player have the public part of the key baked in, and use it to then verify that what was downloaded/installed is valid and has not been tampered with.
This way, as long as you get the first version from a legitimate source, you will only be able to download legitimate updates through the built-in update system.
As long as the private release key doesn't get leaked, I will try my best to never let that happen.
In the worst-case scenario, when a key does leak, or there is a suspicion that it could be compromised, there is a way to rotate it.
This will probably also be done even without a leak as a good security practice and to ensure that the mechanism keeps working.
For someone to distribute a malicious update, they need the key and access to a distribution server that people use.
A key allows for releasing potentially malicious releases, and a server allows for distributing it to existing users.
Bandwidth
Media files are usually large files.
Watching/Streaming media across the internet is basically just downloading the file but at a speed needed for playback and not saving it to disk, just displaying and forgetting.
You have to have an internet connection fast enough to stream the file at the needed speed.
There is no live transcoding or any modification of the media files.
It's just a simple file streamed directly from the server to the clients.
If you want to save on bandwidth you have to transcode the file to a lower resolution and add it on the server beforehand.
Example
Say you have a 4k movie you want to watch with 4 other friends.
Say the movie has an average bitrate of 25 Mbps (that's "Mega bits per second").
So to be able to watch it you should have an internet connection capable of at least that speed.
The movie doesn't always have the same bitrate so there are moments where it is higher and lower, and there is buffering in addition to that.
That explains the client side (you and your friends) needs for bandwidth.
The server needs all of your bandwidth combined.
Since it is sending the file to all of you at the same time, it needs enough speed to do so.
Servers usually come with 1 Gb/s connections available, that is 1000 Mbps.
So theoretically your watch group could be around 40 people in total to watch that 4k movie at the same time.
Some servers offer 10 Gb/s connections, which would x10 your throughput theoretically allowing for around 400 people.
(I have not tested this yet with such a big group, issues may occur)
Depending on where and how you have your server set up, be careful not to go over your allowed data cap.
That could lead to additional costs.
Open Source
Without it, this project simply wouldn't exist.
Starting with the language itself - .NET and C#
Going through the UI framework - Avalonia UI
Ending with the media player - LibVLCSharp
Without these tools being available for free, I wouldn't be able to make this project a reality.
There are, however, issues with going open-source.
There is a good talk from Dylan Beattie about the issues open-source projects face that pretty much nails it. I recommend watching it first:
Open Source, Open Mind: The Cost of Free Software
Below are some of the issues, at the bottom is the future or current plan for how the project will be sustained.
The issues
As many of you may already know, open-source projects usually have a hard time surviving.
Many projects end up being abandoned and eventually stop working or become too outdated to use.
Why?
Time and money.
People who develop these projects usually do so in their own free time and out of their own pockets.
Most people have to get a job to support themselves and their families.
This leads to less free time and mental resources being available for side projects.
It feels good to help people by providing them with software that solves their problems.
But that can't be converted into food or a rent payment.
- .NET / C# is backed by Microsoft and a large community
- Avalonia is offering additional services and features in their paid license
- VLC is also trying to monetize additional services like consulting/support and plugins that add the player in places like Unity
For most projects to stay alive, they need to be maintained, and to do that, they need to be sustainable.
This project has two parts:
- The project logic - The client and server logic for this project
- The backend / "LukLibs" - a collection of libraries handling things like: connections, encryption, permissions, configuration, logging, etc.
The project logic itself has taken quite a bit of time and iterations to reach the current state, and will always take more.
But that is small in comparison to the backend.
It took years of on-and-off learning and developing to write all the logic/libraries to have all the features that currently exist.
I would like as many people to benefit from it as possible.
But, I would also like that to include me as well.
Theft / Malware
When all of the source code is available, just taking it becomes very easy.
There is the issue of someone just taking the code, making their own version, and monetizing the crap out of it without any gain for the original developer.
Especially these days with AI tools being capable of scanning entire codebases and modifying them as instructed.
There is effectively nothing that can be done against this, as I mention later on below with how easy it is to get the source code through de-compilation.
But no code being available adds that little bit of work required to make it happen, and doesn't end up just being scraped off of GitHub.
What could be worse is someone taking the code and distributing malware or crypto miners pretending to be a legit version.
This is why the update system uses signatures and release keys in an attempt to prevent that from happening and to keep users safe.
I only hope I'll be able to keep the original version working and implement all necessary features to the point where no one has a reason to make a new version or search for other solutions.
Donations?
The first thing that comes to mind is accepting donations through something like Patreon or GitHub Sponsors to support development.
That is indeed a possibility and may be set up at some point as a starting point.
With that being said.
How many people do you know that support the open-source projects they use?
The money we earn usually goes towards ongoing expenses or gets saved up for something else.
Donating to open-source software is usually not a part of the thought process.
The percentage of users that use the software, have disposable income, and donate is probably low.
And when they do, it's rarely a monthly subscription to support ongoing development.
I don't know how accurate I am here.
I am basing this on numbers I see looking at some other open-source projects that have GitHub stars in the tens or hundreds of thousands.
And all of the projects that get abandoned, otherwise die due to a lack of funding, attempt to aggressively monetize their users, or transition to a commercial license at some point and get backlash for it.
So, what is the plan?
For the time being, there is no public code repository.
Mainly because I am keeping development private.
The code standard in my projects is "I like it this way" and "I want it written like that."
Which is not exactly a very inviting/friendly environment for outside contributions.
There is certainly code that doesn't align with the "industry standard" way things are done.
Some things are "reinventing the wheel."
But this approach has led me to make something that works better than anything else ever did for me and, hopefully, many others.
The code might eventually be public, with a correct license, once I get it to a point I'm happy with.
The backend libraries changed a lot over the years.
There are things I would like to be done better, some things should be renamed, and others should be re-organized before the code goes into a public repository.
If you wish to look at the code to see what it's doing in a more readable form and make sure it doesn't do anything malicious, we could arrange an "audit" and talk things through.
Especially if you think the networking/security approach has a flaw that could break encryption.
Additionally, C# is, I think, one of the easiest languages to decompile.
One ILSpy download and executable pick, and you see it all.
If you are afraid that the software connects to anything, you are most likely a more cautious user (rightfully so).
I would recommend tools like Wireshark to see for yourself that there is no network traffic outside of what you want to happen.
Keep in mind that automatic update checking is implemented and can be disabled.
In the future there might be additional connections to other backend servers for additional functionality like a server browser.
Future
When you offer something for free, people are happy.
When you ask them later to compensate you for your work, they are angry.
They feel betrayed as you are suddenly asking for payment for something that was free.
I'm saying it upfront to not leave any ambiguity.
If the project ever gets a wider audience and becomes stable, I will try to monetize it.
I am thinking of a single-time purchase that will cover client and self-hosted server use.
But, I am not going to force everyone to pay when you don't even know if you will ever be using the software more than once or a few times a year.
All features will be available regardless of purchase status.
The idea is that you can download and use the software for free, but you will get a startup notification/pop-up asking you to consider supporting the project and purchasing it.
If you like the project, intend to keep using it, and have the means to support it, you can purchase it, and the pop-up will be removed. (A thank you will probably be added somewhere)
If you don't purchase, you can keep using it, the popup will just keep reminding you that you can always do so.
(Don't know about you, but I too tend to forget which software I should support without anything reminding me)
There is also an idea that there might be an optional additional service available with additional features for a small monthly fee.
Things that rely on me hosting more servers. (thus the recurring payment)
The hope is that with this model, it will be possible to continue ongoing development.
If it's not, I may ask for donations in the even more distant future.
If it doesn't work, the project may not receive updates as frequently or eventually almost at all.
I will not attempt to gather user data to sell or add any advertising to cover server hosting costs like it is done with almost all of todays websites/applications that appear to provide these features for free.
When the product/service is free, you are the payment.
Be it your data, attention, or other input you provide.
Services, applications, and websites pop up, provide a multitude of services, all for free.
Users jump on, everyone starts using them.
Then, after some time, things start to change.
Money is running out, users are not generating any revenue, and the service/app/website starts limiting features, removing them, or putting them behind a subscription.
Advertisements appear, and maybe a shop is added with a push for users to start using it.
This process is called Enshittification.
It is observed over and over again, things start out nice for the users.
Then the focus shifts to becoming profitable, and users are either monetized in some way or leave.
These projects are unsustainable from the start, running on a constant loss, backed by investments, hoping to get as many users as possible, make it hard to leave, and later on squeeze their wallets.
People keep going for it since nothing can beat "free".
They don't understand or care how the monetization works since there will eventually be "the next big thing" that everyone will jump over to once the previous thing degrades badly enough.
I am trying to make the project sustainable from the start or not do it at all.
With the current approach of "free with a pop-up", I may still never see any income, but I don't want to force anyone to pay for something they haven't even tried.
Limited features, trial periods, even when tied to some form of account, are very easily bypassed and only lead to cracked versions of the software being distributed with who knows what else put in it.
In an ideal world, people would support the free and open source software they use, incentivizing doing more of it.
But that is unfortunately not the world we live in.
There is open source code out there with downloads and user counts in the millions or billions at this point.
Some libraries are dependencies that are used in others, and those are used in others in a chain of code that eventually powers everything we use directly or indirectly.
Relevant xkcd 2347:
If the authors/maintainers of these libraries/packages/projects would get even a fraction of the revenue made using their code, these people would never have to worry about their financial situation ever again.
They could dedicate even more of their time to improving the code, fixing bugs, and implementing new features.
Instead, they might get a thank you on a good day, but usually just more opened issues or bug reports asking them to fix as soon as possible because someone is loosing money since their application isn't working correctly.
All while the authors/maintainers have to work their day job to avoid becoming homeless.
Sure, there are some who are compensated for their work, but those are the exceptions, not the standard.
If this project manages to get any revenue.
I intend to keep passing on some of it to the projects I rely on.
They provide me with the tools I need and are the reason I was able to gain said revenue.
It is only fair for them to also benefit from their work.
I am laying it all out here to not have to explain it to everyone one-by-one. 🙂
It's all still a faraway future if it happens at all.
I am hoping that this approach will be sustainable and a benefit for all involved.
Contact
If you wish to contact me (lukassoo) or talk about the project, you can visit the Discord server
There are channels dedicated to bug reports and feature/improvement requests.
Others might also be able to help on the help channel.
Gallery
Random images of the project.
Usually people look for how things look like before they install.
I'll try to update images when any major changes happen.
Installer
(The updater looks very similar)

After a fresh install
Media library
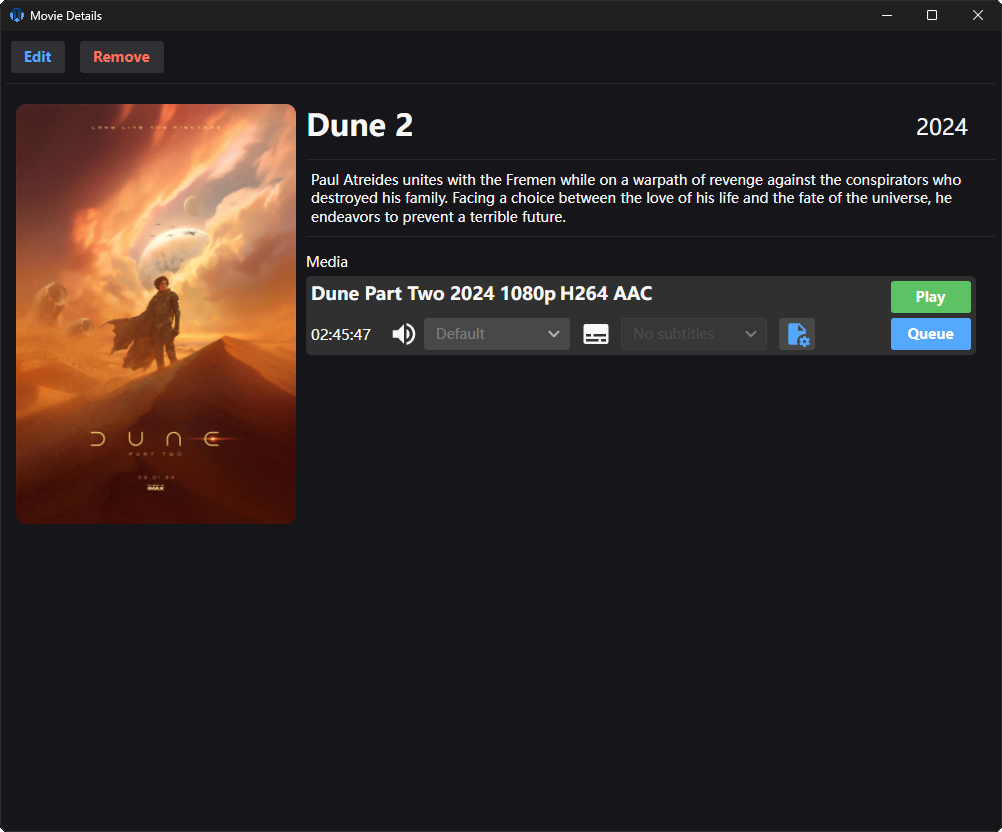
Movie details
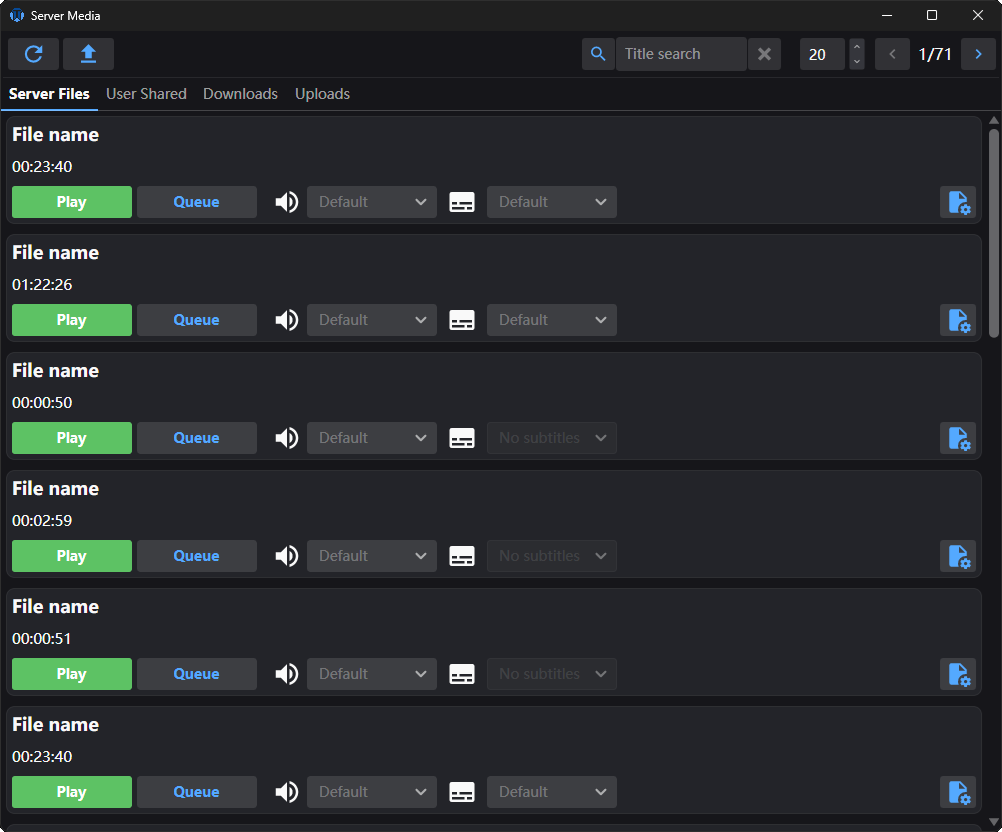
Server media
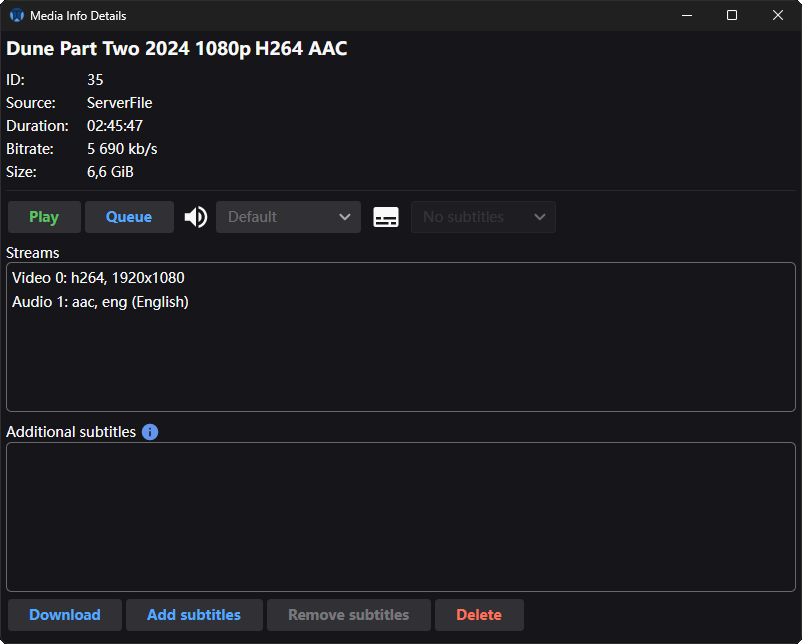
Media info details
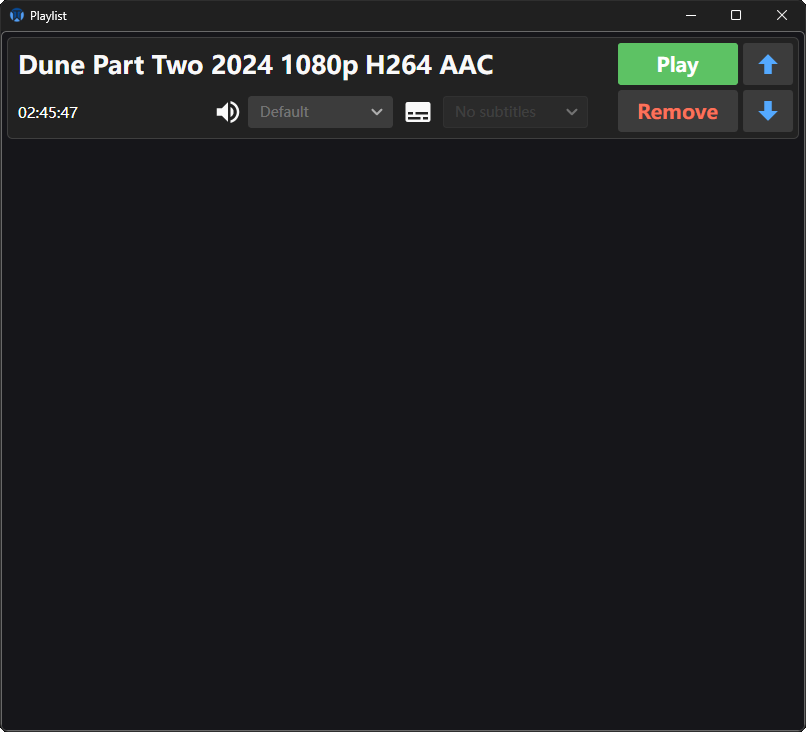
Playlist
Admin panel

Server tab
Media tab
Group tab
Group creation
Group joining
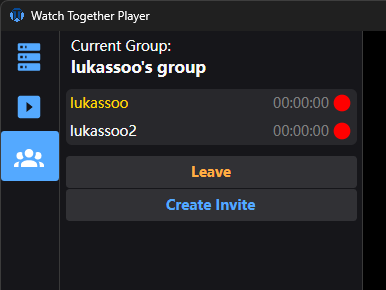
Group inside
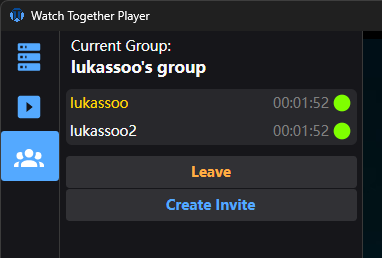
Group watching
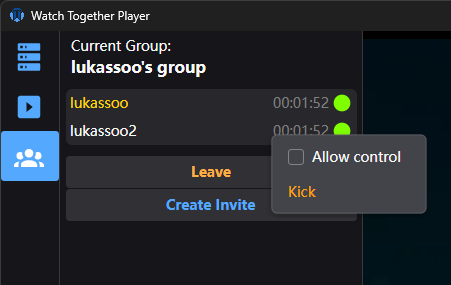
Group management
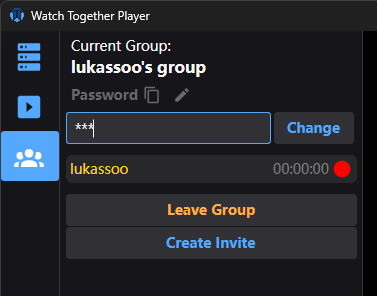
Group password management
Client setup
The client setup is very simple.
- Download the client installer
- Launch the installer
- Follow instructions and wait for it to finish
- Finish installation, optionally leave the launch option ticked to start the player
Platforms
There are some platform-specifics issues that you will have to go over in order for the installer and/or player to work.
Windows
Will probably show SmartScreen, tell you this application is unknown, and attempt to stop you from using it.
It may even not let you download/extract the installer.
To make it work, you probably have to disable Windows Defender or any other anti-virus software you have to let the installer do its job.
If you know how to do it, add an exception.
SmartScreen has a "More info" button that when clicked will show an option to allow it.
The installer will probably ask for admin on launch to be able to use any install directory.
You can change it to any folder you want before installing.
Linux
Should just work.
Might need you to make the installer executable after extracting.
Some window managers may not like the second overlay window the player uses due to a technical limitation of the UI framework.
I have tested with Ubuntu.
Mac OS
Since I don't own any devices, and there is no simple way to virtualize it, I can't reliably test how things work.
From what I have heard, you have to go into some settings and "allow" it to run anyways.
I will probably eventually get a hold of how to properly package in the ".app" format for it to mostly work.
If you only get a zip file containing a single "Installer" file - you probably have to run it through the terminal.
You may need to make it executable first if it's not.
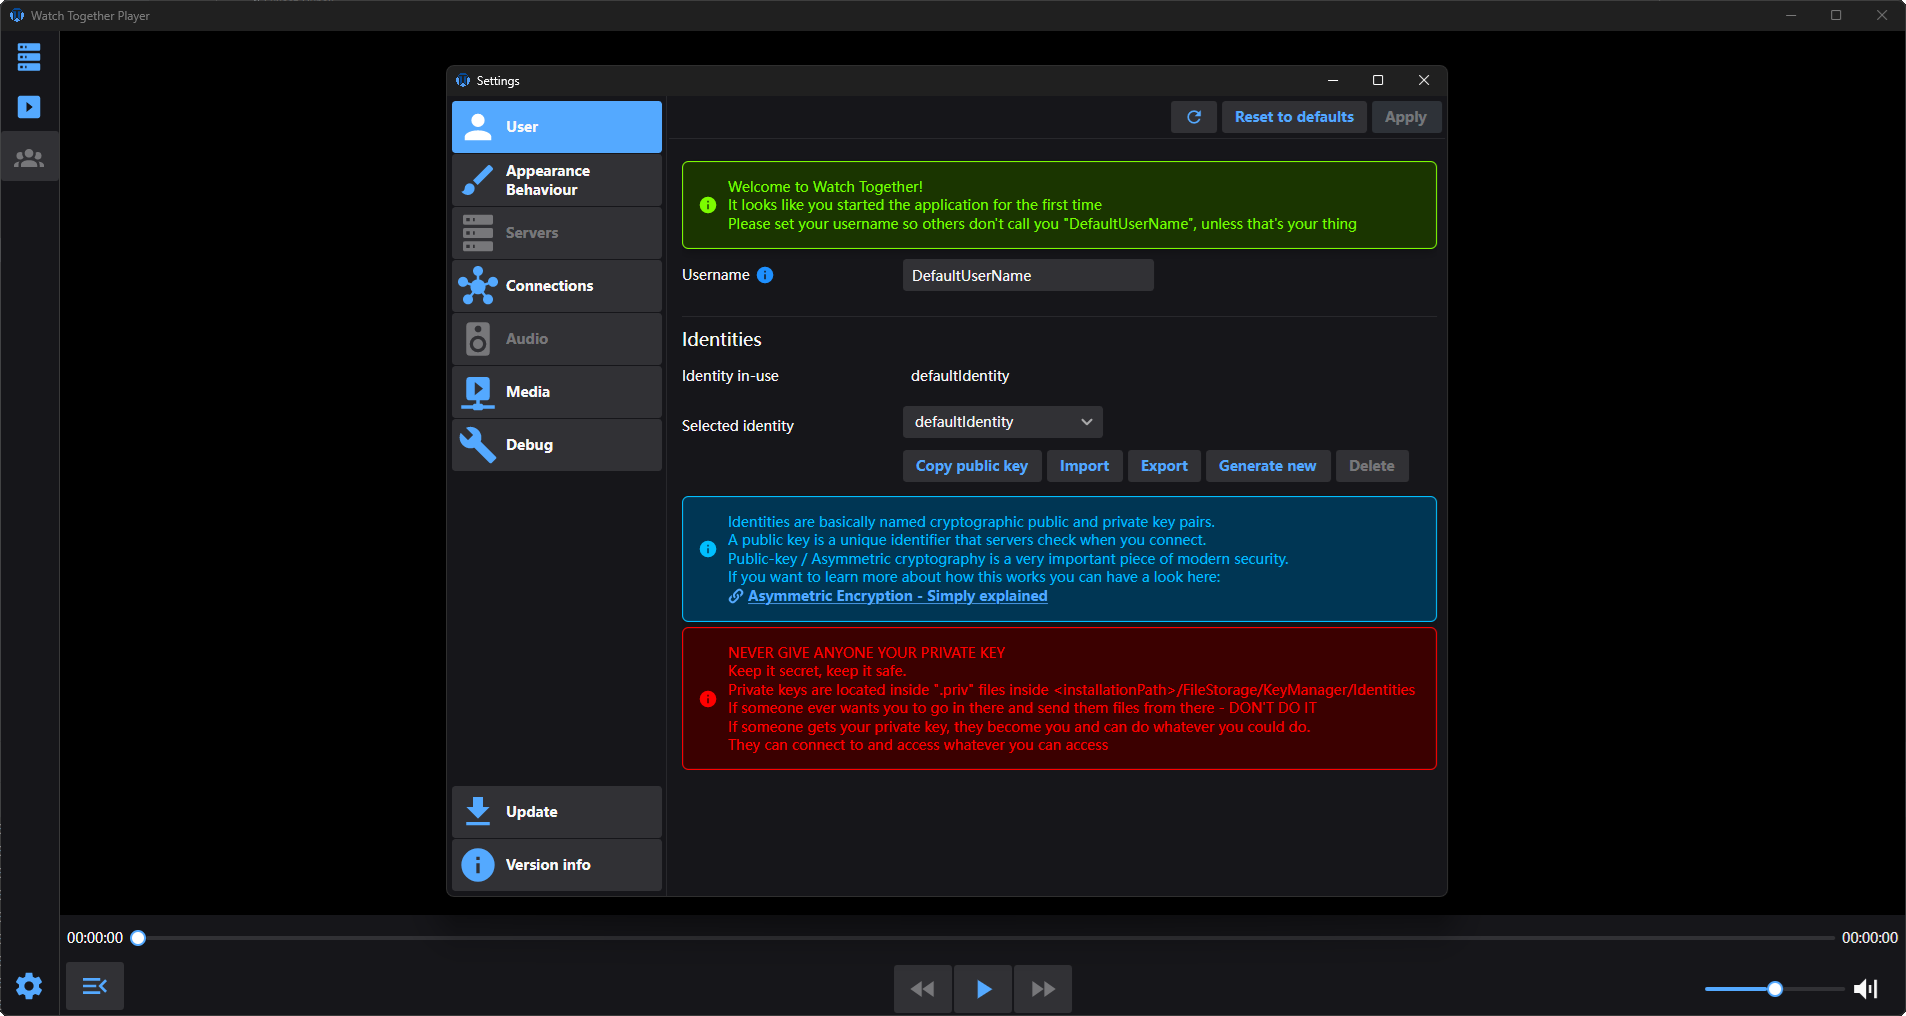
Once the client/player starts for the first time, you should be greeted by the settings window asking you to change your user name.
You can also have a look around to see what is where.
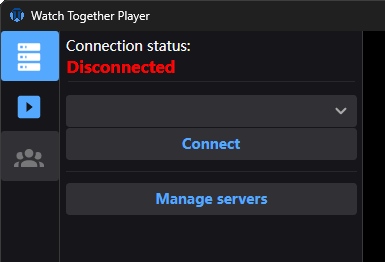
From that point onwards you will most likely want to connect to a server.
On the main window there is a side-menu with tab icons.
If you hover over them, they will show you a tooltip to indicate what they are.
You can always just click them to see what they have inside.
The first one from the top should be the server tab where you can quickly go to server settings through the "Manager servers" button.
Once you click it, you will see the server settings tab with your server list.
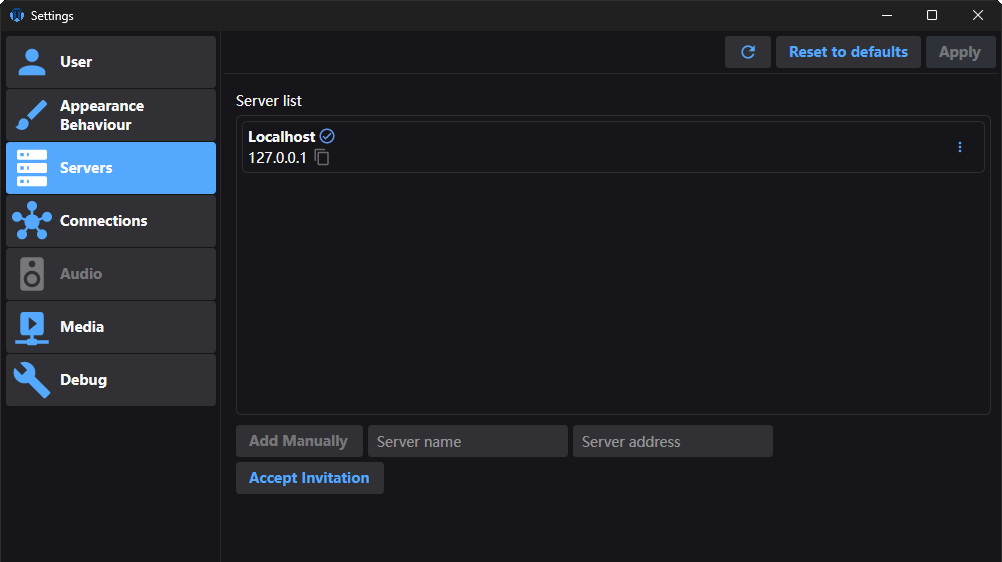
Here you can manually add servers or accept an invitation.
Invitations are the recommended and main way to add users to servers.
Whoever hosts the server will have a read about the invitation system and know how to make one.
As a user you should receive an invitation link from the person hosting the server.
On Windows and possibly other platforms in the future, you can simply click the link and it should pop-up with the details for you to accept like this:
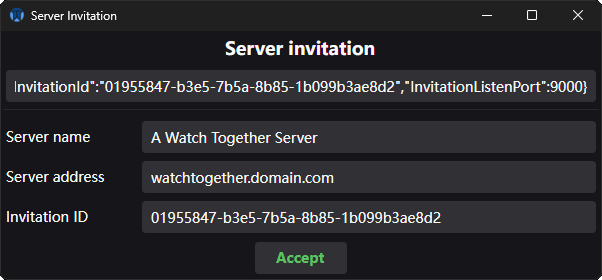
Once you accept, and invitation processing succeeds, you can then close the popup and connect to the server.
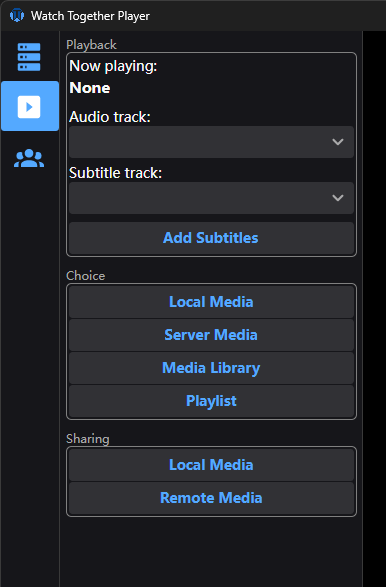
Once connected, you can switch over to the media tab.
Now, depending on what permissions you were given, some of these option may be unavailable or empty inside.
The server host/owner/admin decides who has access to which media through the admin panel.
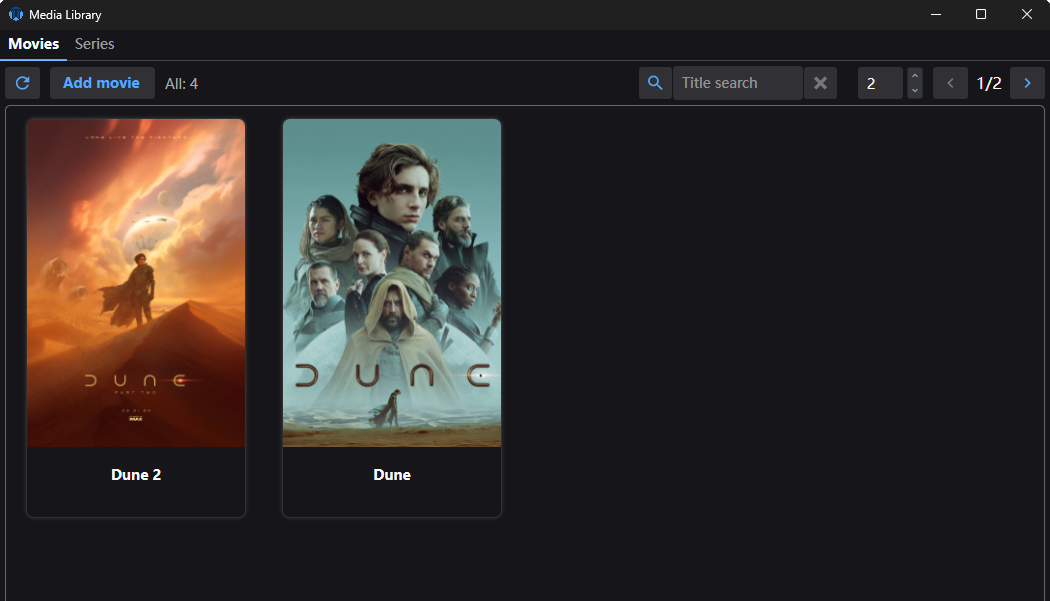
As an example, you can get into the media library.
Or server media.
Now, when you want to actually watch together with multiple users.
You go into the group tab.
And go ahead with creating a watch group.
Server setup
Keep in mind that by the end, you will need a generated user key pair from a client/player installation in order to tell the server who the owner is and to be able to connect to it.
The current simplified way to install the server is to use the provided docker-compose.yaml file below.
services:
  watch-together-server:
    image: lukassoo/watch-together-server:latest
    ports:
      - "9001:9001"
      - "9000:9000"
    volumes:
      - ./wt-server/FileStorage:/App/FileStorage
      - ./wt-server/logs:/App/logs
    depends_on:
      - postgres

  postgres:
    image: postgres:17.2-alpine
    volumes:
      - ./wt-server/database:/var/lib/postgresql/data
    environment:
      - POSTGRES_PASSWORD=postgres
      - POSTGRES_USER=postgres
Instructions
- Install docker compose on the target server/system
- Create a docker-compose.yaml in the directory where the data will be stored
- Copy and paste the contents above inside the file
- Run docker compose up -d (inside the directory with the docker-compose.yaml file)
docker compose up -d
This will pull the necessary images and run the server.
There will be a new directory created called "wt-server" where you started the command.
Inside this directory there will be 3 sub-directories:
- FileStorage - Configuration, temporary directories, and the "Media" directory that you will be interacting with.
- logs - Server logs.
- database - Postgres database data.
The FileStorage directory will look like this:
- FileStorage
- Configuration
- KeyManager
- Media
- MediaLibrary
- RequestTemporary
- UploadTemporary
- UserManager
Right now you will be interested in the UserManager directory.
In there you will find a file called "serverOwnerKey.txt".
Inside it you have to paste your client public key.
You get it by starting your player/client application and in the server tab key section clicking copy.
Once pasted and saved, restart the server. (Go back to where the docker-compose.yaml file is)
docker compose restart
The startup process shouldn't take long and you should now be able to connect to your server by providing the address to the server in your player/client.
You can observe the server logs live with:
docker compose logs -f
The server listens on port 9001 by default, you don't have to type the port in the client if you didn't change it.
After connecting you should have an admin panel button appear in the bottom left corner of the client app.
This is the place where you manage the server, its media, including users, and their access.
You can now proceed to adding media to your server and inviting users.
Updating the server
When a new version of the server comes out, you will eventually want to update it.
To do so is very simple:
First we stop it:
docker compose down
Then we pull the new images:
docker compose pull
And start it back up:
docker compose up -d
(-d makes it "detached", so it doesn't consume your input and doesn't stop when you log out)
Cleanup
Old server images can start taking up storage.
To clean them up after an update you can run:
docker image prune
It will ask you if you want to remove "dangling" images, you confirm and the space should be reclaimed.
Adding Media
Once the server is set up and running, you should probably give it access to some media files you want to be able to watch.
There are multiple ways to give the server access to media files.
- Putting media inside the Media directory
- Uploading files through the client application
- Sharing local files through the client application
- Downloading media through remote-requests
Technical details to keep in mind
The way the server stores media metadata in the database relies on the file path.
If you take a file and rename it or move it to a different directory, it's path hash will change and it will be recognized as a new file.
Currently there is no rename/move option but if it's a commonly requested feature it will be added.
Putting media inside the Media directory
The first and most common way is to simply put them inside the Media directory.
Anything inside wt-server/Media will be scanned on server start and when a manual scan is started from the admin panel.
It is recommended to keep the actual media inside main sub-directories like Media/Movies and Media/Series.
For example, Media/Uploaded and Media/Downloaded are created by default for uploaded using client upload and downloaded files through remote requests to keep things more organized.
You can mount a NAS directory inside the directory as well, but you will need to restart the server for it to take effect.
Upload files through the client application
When connected to the server and with the "UploadMediaToServer" permission (or administrator) you will be able to upload files through the Server Media window.
Uploaded files will be put inside Media/Uploaded
Sharing local files through the client application
Sometimes there is no need to keep a file around for long, or no point in uploading it to the server just to delete it afterwards.
This is where local file sharing comes in.
You can pick a file available on your local machine to be shared with the server.
Currently, there is no access control for this.
Everyone on the server will be able to see it and play it.
When you want to play it, the player will use the local file stream to not waste server bandwidth.
Media shared like this is available in the Server Media window in the User shared tab.
Downloading media through remote-requests
When you have a link to some media like a video or a clip, you can use the "Remote Media" button to open the "Media Requests" window, paste the link and click "Request".
The server will try to download the media present at that link.
This is how you watch media from external websites.
Using yt-dlp behind the scenes for this, currently set to download at most 1080p.
(will be exposed to settings)
Storage while downloading
While yt-dlp is downloading and processing the file, it does so in a separate directory "RequestTemporary".
Make sure you have enough storage space available for about twice the size of the file you are downloading.
This is because sometimes the best quality video and audio are available as separate streams and are downloaded as such and then later merged.
After all processing finishes, the finished file is copied over to the final directory, all temporary files are deleted, and the space is reclaimed.
Downloaded files will be put inside Media/Downloaded
Invite system
This system allows server hosts/owners to invite users and give them access from the start.
At the moment, access groups are not included, only authorization and permissions.
You can decide if the server is listening for invitations and on what port by modifying the server configuration.
(FileStorage/Configuration/Server.cfg)
Keep in mind that without invitations, you have to add users manually by getting their public key. (available in the User settings tab)
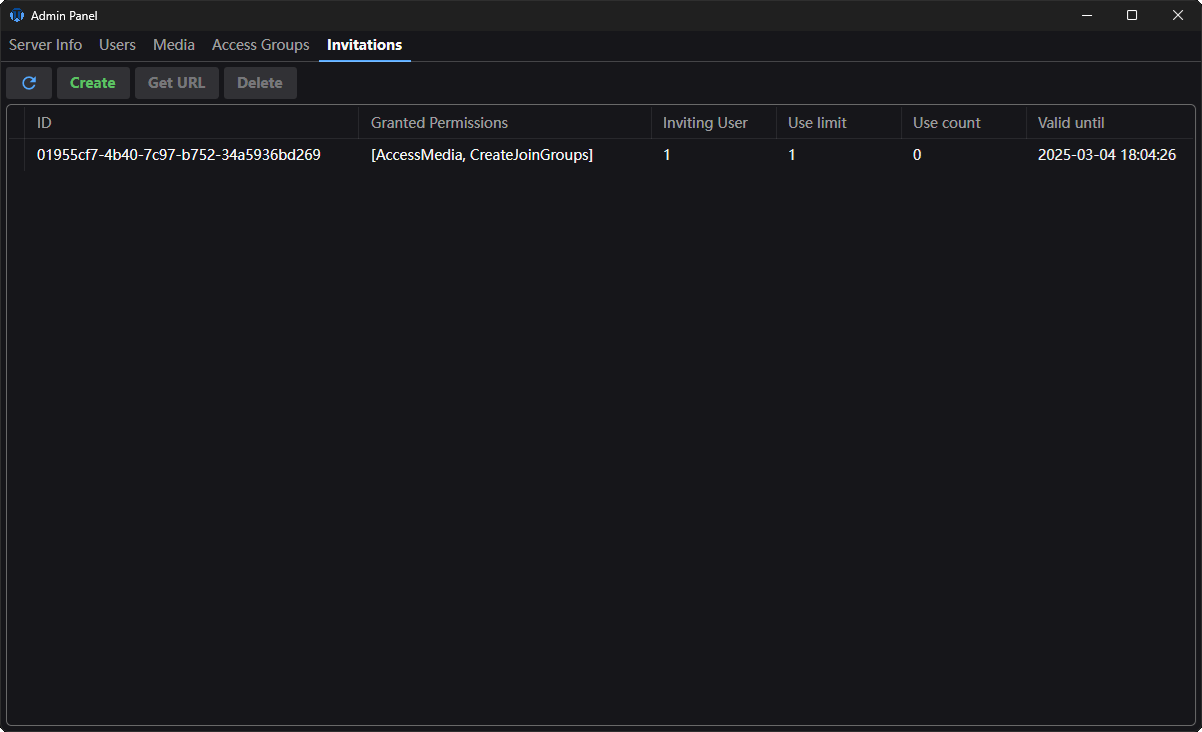
As a server owner you can manage invitations in the invitations tab in the admin panel:
After clicking the "Create" button you will see a creator window:
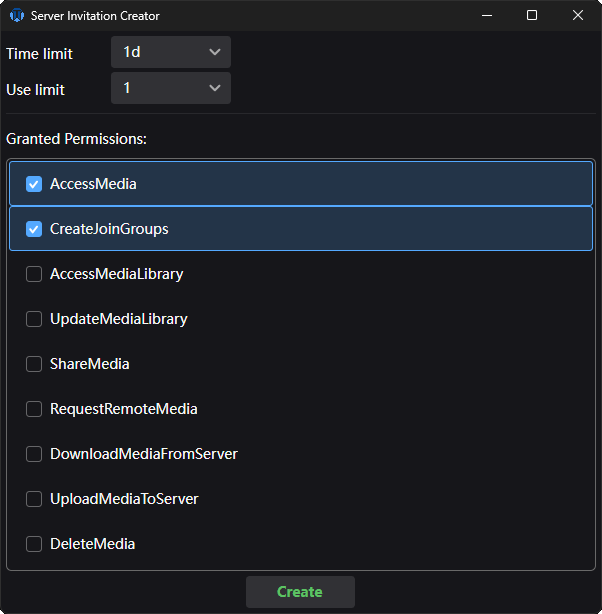
You decide on the time and use limits on this invitation as well as the default permissions given when someone uses it.
For better security, you can not grant the "Administrator" permission through a invitation.
(It is checked server-side as well, you can not just modify the serialized invitation and put it in there manually)
Be careful when sending out unlimited-use or highly-privileged invitations to random people.
Someone will eventually make a bot to spam servers with invitation accepts and you will end up with a ton of random users in the database.
I recommend sending one-use invites to specific people.
Make use and time limited invites when a bigger group of people is involved.
After you created an invitation and select it, you will have the "Get URL" button enabled.
When clicked, you will get a window allowing you to customize the URL before copying.
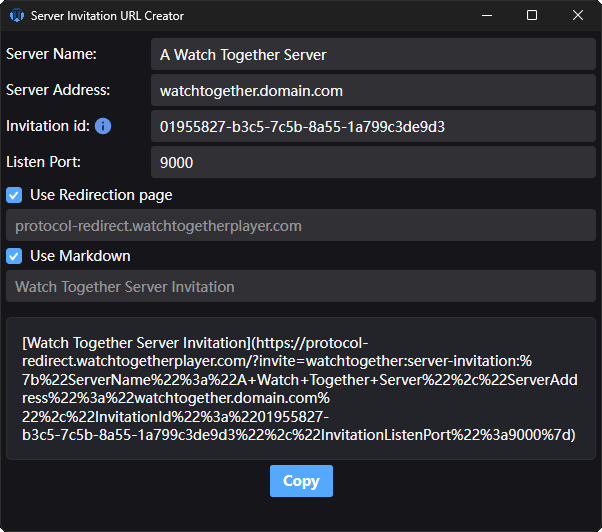
At the time of writing this, some of the automatically filled-in information are taken from your client and some from the server.
This means, you have to correct some things if they are incorrect.
The server name is usually just the name the server owner picked.
Someone can rename the server on their side, you can set the first name they will see.
The server address is filled in as the one you use to connect to the server.
You can use a direct IP address or a more friendly domain name instead if you know how to do it.
The listen port has to match what the server is listening on for invites.
It is port 9000 by default if you didn't change it.
If you did - you will have to put in the correct number as it is not filled in from the server at the time of writing.
User Redirection page
This option embeds the invitation inside a parameter on a redirect website.
The main player domain is providing the "protocol-redirect.watchtogetherplayer.com" endpoint which expects the "invite" parameter to be set containing the invitations.
This allows less technical users to simply click the link so their browser opens it and redirects to a custom "URL Protocol" which the player registers after starting if the user allows it.
User markdown
This option embeds the final URL inside markdown syntax allowing it to appear as "Watch Together Server Invitation" instead of the whole blob of text as a link, in places where it's supported like Discord.
Accepting
On platforms where URL Protocol handling is implemented (Windows at the time of writing), users can simply click the link and tell their browser to open it in the application.
If a given platform doesn't support the protocol yet, they have to copy the link and open up server settings where they will find "Accept" buttons for both server and watch group invitations.
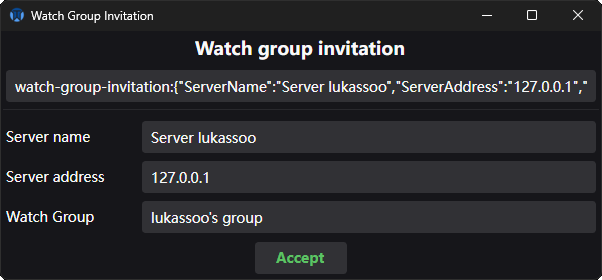
The popup should automatically paste in the invitation when it appears if you copied it before, if not, paste it in the text field inside.
If everything works as expected, the user will get a popup asking them if they accept the invitation:
Once they accept, the server is put on their server list and they are informed if the process succeeded.
They can then then proceed to pick the server in the server tab and connect to it.
Alternatively, once a user is already on the server, you can send them watch group invitations
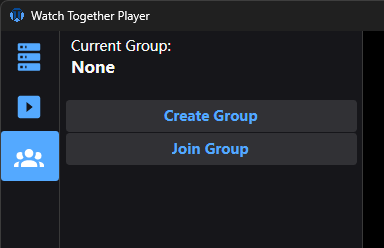
Watch groups
The way to synchronize playback of a group of users.
In the player side menu there is a group tab.
It will only be enabled when connected to a server.
Once in it, you will have an option to create or join a group.
(If you have permission to do so.)
The creator of a group is considered its owner (gold user name) until he leaves.
At that point, another user is promoted to the owner or the group is deleted if there are no users left in it.
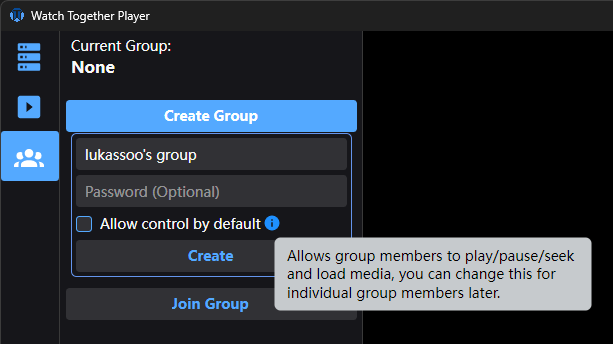
Group creation
You can also give or take control afterwards.
The password can be quick copied and changed as well.
(Currently only if you start with a password protected group)
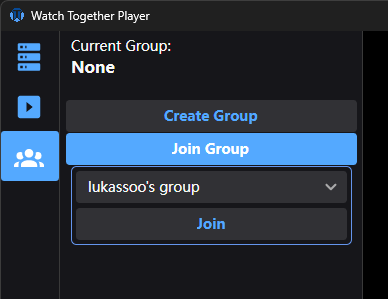
Others will have to join your group.
If you set a password, they will have to provide it as well.
Best approach
- Create a group
- Play the media file but keep it paused.
(Optionally seek to the time you want to start watching from) - Wait for everyone to join and become ready. (green status)
- Play/Resume
Invite others
Once you have a group set-up, you can send out invites to other users.
Synchronization
The server and player will try their best to keep everyone in the group synchronized.
It starts with replicated play/pause/seek commands sent to the server which then relays them to the rest of the group.
Then as the media plays, everyone in the group sends their current watch time to the server which is also relayed to everyone.
There is a player background process running that keeps track of the difference between the local playback and the group owner.
If that difference goes over a certain threshold it will attempt to reduce it by slightly increasing or decreasing local playback speed.
The playback speed is adjusted by 5% so it shouldn't be noticeable when watching.
Now, it turns out that synchronization is not a simple task when taking internet latency and possible packet loss into account.
I am using TCP connections so loosing a command is pretty much eliminated but latency is something you can not eliminate.
If there are issues with synchronization its usually best to slow down.
Users in a group have ready-state indicators, whenever you do an action that causes them to turn red, it means they are currently not ready to resume playback.
So for the smoothest/best experience it is recommended to wait until everyone is green - ready to go.
Hot-join
There could be a situations where someone joins the group while it is already playing media.
The server will attempt a "hot-join":
- It will pause playback for the entire group.
- Seek everyone to the same time (while telling the joining user to load the media at the given time as well)
- Wait for everyone to become ready
- Resume
You shouldn't need to do anything when this happens.
However, it is possible for the process to fail if the group doesn't reach ready-status in time.
This will require manual intervention.
Media access
Watch groups have a special ability to by-pass regular access control.
Watch group invitations
Quickly send out a link for others to join your watch group.
Note: This only works for users that are already authorized on the server.
You need an invitation to get them on the server.
When you are in side a watch group, you have the "Create invite" button available.
After clicking it, you will get a invitation creator window:
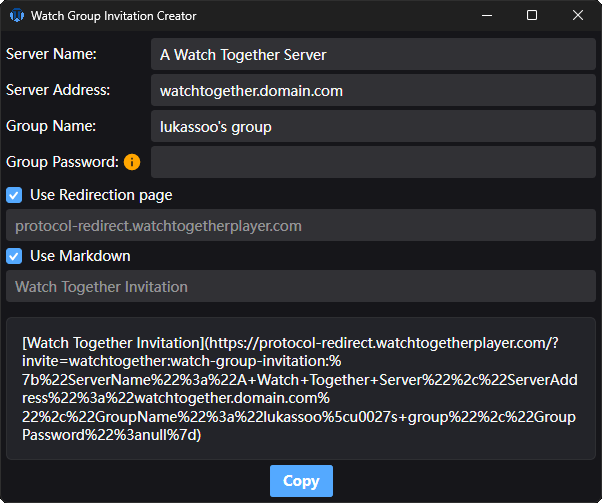
Check and update any information that is not correct.
The most important fields are the server address and group name.
The server name doesn't have to match someone's server list, it is usually just the name the server owner picked.
Someone can rename the server on their side.
If the receiving user doesn't have a server with the given address on their list, they will be warned but can still try to accept. Of course they have to be added/authorized on the server you are inviting them to join, as mentioned at the start.
You may have a server address in the form of a direct IP address or a mire friendly IP address.
It's best to keep it consistent between users to not have issues with warnings later.
The group name should always be correct and is the name that the receiving users will look for after joining the server.
User Redirection page
This option embeds the invitation inside a parameter on a redirect website.
The main player domain is providing the "protocol-redirect.watchtogetherplayer.com" endpoint which expects the "invite" parameter to be set containing the invitations.
This allows less technical users to simply click the link so their browser opens it and redirects to a custom "URL Protocol" which the player registers after starting if the user allows it.
User markdown
This option embeds the final URL inside markdown syntax allowing it to appear as "Watch Together Invitation" instead of the whole blob of text as a link, in places where it's supported like Discord.
Accepting
On platforms where URL Protocol handling is implemented (Windows at the time of writing), users can simply click the link and tell their browser to open it in the application.
If a given platform doesn't support the protocol yet, they have to copy the link and open up server settings where they will find "Accept" buttons for both server and watch group invitations.
The popup should automatically paste in the invitation when it appears if you copied it before, if not, paste it in the text field inside.
If everything works as expected, the user will get a popup asking them if they accept the invitation:
Once they accept, they get connected to the server and automatically join the watch group with the given name.
Playlist
Client sided playlist.
You can queue media that you intent on playing so you don't have to keep the server media or media library open.
Adding media to this list also enables the "Next" button besides the Play/Pause button in the player controls.
Subtitle and Audio tracks
Movies and series of all kinds can be in different languages.
In most cases there are usually subtitles in different languages but some do get dedicated audio tracks.
When you go to play a media file, you can choose the tracks you want and the entire watch group will have them set as well.
Individual users can then change them for themselves locally or add a custom subtitle file if they want to.
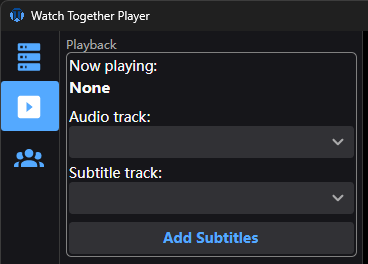
Custom subtitle file
When a media file is playing you can click the "Add Subtitles" button in the media tab to pick a additional subtitle file to load.
After loading, you can choose them from the track dropdown list above.
Server side additional subtitles
It is possible to upload additional subtitles files to the server and use them when playing media.
There are cases where the media file doesn't have the subtitles you need baked in.
This allows for adding them without baking them into the file.
The way this works is:
- You upload a additional subtitles file to the server
- It becomes an option in the subtitles list
- When you play media with additional subtitles, they get downloaded and added to the currently playing media.
Media library
The place you can add movies and series.
Each movie and series season can have media files attached.
For movies you can have files with multiple resolutions or different languages/subtitles available.
For series there are seasons which have media files attached.
It is probably better to make a separate series with the name/title containing the language.
Local media sharing
When you have a media file on you local hard drive.
In the media tab sharing section there is a "Local Media" button.
Once you click it, you will see a window pop up with a "Share File" button.
Click it and pick the file you wish to share.
Keep in mind that file will be accessible to the entire server.
There is currently no access control built into this way of sharing.
Once you pick the file you can see it being shared with the options to stop, play and queue.
For other users it will be accessible in the media tab / "Server Media" window / "User Shared" tab.
Admin panel
The place to manage the server.
There are multiple tabs to handle different things.
Users
Handles users, you can add/remove, authorize, and manage permissions.
If you give someone the administrator privilege they will also have access to the admin panel.
The server owner can not be touched.
It is simply hard coded that owner permissions can not be modified and he can not be removed.
New users
When a new user attempts to join the server, he gets rejected.
But his key is saved and you see a new "Unknown" user on the list.
You can then decide if you want to authorize him and what permissions he can have.
You can also ask the users to send you their public keys (available in the server tab) so you can add them before they even try to connect.
It is recommended to assign a few default permissions to allow a user to play media:
- Access media - Allows commands for retrieving media info and stream file segments for playback.
- Create and join groups - As the name suggests.
As for what media the user has access to, you will see below in the Access Management tab
Media
Shows the current media file / movies / series counters.
You can trigger a manual media scan from here.
You can start a database cleanup of no longer existing media files.
This will go over every entry in the database and check if the media file still exists and delete the entry if not.
Additionally, it is possible to add/remove additional media directories.
This is not something you would do using a containerized approach since the only point where media can be is the "Media" directory.
If you were to install the server outside of a container, that would allow for adding any other directory to scan in addition to the regular Media directory.
Keep in mind, media paths have a direct effect on file recognition
Read more here
Access Groups
Here you can create and manage access groups.
An access group is a a way to handle which media files, movies, and series a certain group of users have access to.
Once you create an access group or pick the "Default" group, you will see its details.
User count, assigned media files (including attached media from movies and series), movies, and series.
Then there are buttons to manage each of them - add/remove.
How it works
By default new users don't belong to any group at the moment.
You decide what groups you create and assign users to.
Once a user is assigned to a group, they gain access to all media files, movies and series the access group has.
Without any access groups a user can not see or play anything from the server.
There is one exception to this rule.
Watch groups
When you have a group of users in a watch group and want to play a movie, you don't want to suddenly find out that some of them don't have access to it.
You would have to go into the admin panel or ask an admin to do so in order to give access to the movie for everyone in the group.
This can also get quite complicated if there are many access groups involved.
Watch groups can by-pass regular access control.
To solve this issue, when a user that has access to a given media file plays it in a watch group - everyone in the group gains temporary access to it.
This is a much better user experience and only gives access to that one single file as long as its being played inside the group and only for the users in it.
Invitations
Here you manage invitations for new users to be able to join.
Detail over in the invitation system